You know the spot. Right outside the bedroom door, or maybe at the top of the stairs — that one board that announces every late-night trip to the kitchen. Learning how to fix squeaky floorboards isn’t complicated, and in most cases you don’t need a carpenter or a full day off work. It usually comes down to loose wood rubbing against a nail, or a subfloor that’s shifted slightly over time.
I’ve fixed squeaks in three different homes now, and every single time I assumed it’d be a bigger job than it turned out to be. Let’s get into what actually works.
Why Do Floorboards Squeak in the First Place?
Direct answer: Floorboards squeak when wood rubs against wood, or wood rubs against a loose nail, usually because of gaps that form as the material dries out and shifts with humidity changes over the years. Temperature swings and foot traffic make this worse over time.
In Indian homes, especially older ones with wooden flooring in hill stations like Shimla or Ooty, humidity swings between monsoon and winter cause real movement in the wood. That expansion and contraction loosens fasteners bit by bit. It’s not a manufacturing defect most of the time — it’s just wood being wood.
Concrete subfloors with a wooden overlay can squeak too, usually because the adhesive layer has dried out or wasn’t applied evenly to begin with.
Locating the Exact Squeak Before You Touch Anything
Don’t skip this step. Seriously.
Walk slowly across the area barefoot (you’ll feel more than you think) and mark every spot that creaks with a small piece of chalk or tape. Get someone to walk while you listen from below if you have access to a basement or crawlspace — that’s the fastest way to pinpoint the exact joist.
A few tips here:
- Squeaks near walls are usually easier fixes than squeaks in the middle of a room
- If multiple boards squeak in a line, you’re probably dealing with a joist issue, not individual boards
- Early morning is a surprisingly good time to check — the house is quiet enough to hear small differences in sound
Fixing Squeaks From Below (If You Have Access)
If you can get under the floor — through a basement, crawlspace, or open subfloor — this is honestly the easiest and least invasive method. No need to touch the finished floor at all.
- Locate the squeaky spot from above and mark it, then go underneath with a helper coordinating
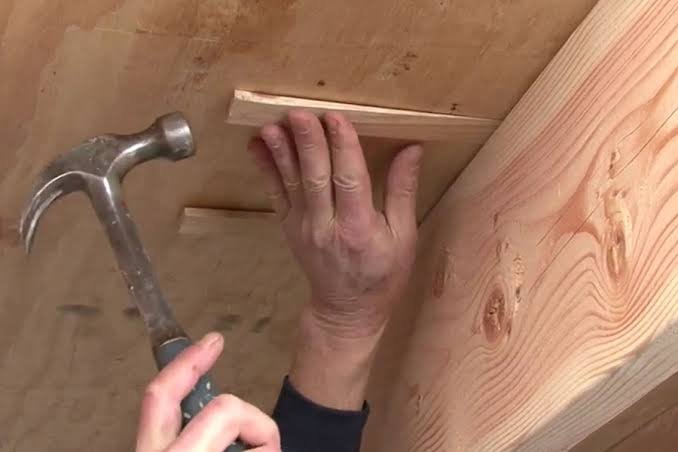
- Look for any gap between the subfloor and the joist — a playing card or thin wood shim slides in here nicely
- Use construction adhesive on the shim before inserting it, don’t just wedge it in dry
- For bigger gaps, screw a cleat (a small wood block) alongside the joist to add support
This method works particularly well for older homes with wooden joist construction — think colonial-era bungalows in places like Pune or parts of old Delhi.
Fixing Squeaks From Above (No Access Below)
Direct answer: When you can’t reach the subfloor, use specialty screws designed to snap off below the surface, driven through the finished floor into the joist, then fill the small hole with matching wood putty. This method takes under 20 minutes per squeak.
Most hardware stores in India now stock squeak-repair kits — brands like Bosch and Taparia sell versions of these snap-off screw systems, usually priced between ₹400-900 depending on the kit size.
Here’s roughly how it goes:
- Find the joist location using a stud finder (or just tap and listen for the solid sound versus hollow)
- Drill a pilot hole to avoid splitting the board
- Drive the screw at a slight angle through the floorboard into the joist
- Snap off the screw head at the depth line and fill with wood filler
[link to related guide on choosing the right wood filler here]
Dealing With Damaged or Warped Boards
Sometimes it’s not a squeak — it’s actual damage. Cracked boards, water stains, warping near a window where rain’s been getting in. That’s a different problem entirely, and honestly, trying to “fix” a warped board with screws alone rarely works long-term.
If the damage covers a small area, replacing individual boards is usually more cost-effective than refinishing an entire room. A carpenter in a mid-sized Indian city will typically charge ₹150-350 per board for replacement, materials included, though this varies a lot by wood type.
Talcum Powder and Other Quick Temporary Fixes
Not ready for a full repair? Fair enough — sometimes you just need the noise gone before guests arrive.
Sprinkling talcum powder or powdered graphite between the boards can reduce friction enough to quiet things down for a few weeks. It’s not a permanent fix, more of a band-aid, but it genuinely works in a pinch.
[link to related article on general home maintenance checklists here]
When to Call a Professional
If your entire floor creaks — not just one or two spots — that could point to a structural issue with the joists themselves, and that’s not a DIY weekend project. Sagging floors, visible joist damage, or squeaks that come with a slight bounce underfoot are signs to bring in a structural engineer, not just a handyman.
[link to guide on identifying structural home issues here]
FAQ: How to Fix Squeaky Floorboards
Can I fix squeaky floorboards without removing carpet? Yes, for the most part. Squeak-repair kits are designed with a probe that finds the joist through carpet, so you can drive the screw without pulling anything up.
Does talcum powder actually work for squeaky floors? Temporarily, yes. It reduces friction between boards, though it wears off with foot traffic and cleaning, so treat it as a stopgap rather than a real fix.
How much does it cost to fix squeaky floorboards professionally? In most Indian cities, expect to pay somewhere between ₹500-2,000 per visit for minor repairs, depending on how many spots need attention and whether subfloor access is easy.
Is a squeaky floor a sign of a serious problem? Usually not — most squeaks are just loose fasteners or natural wood movement. It’s only concerning if it comes with sagging, bouncing, or visible cracks in the ceiling below.
Can WD-40 fix a squeaky floor? It can help temporarily on metal hardware like hinges near the floor, but it’s not really meant for wood-on-wood friction and can leave stains, so I’d skip it for actual floorboards.
How long does a squeaky floorboard repair take? Most single-spot fixes take 15-30 minutes once you’ve located the joist. A whole-room job with multiple squeaks might take an afternoon.
Final Thoughts
Fixing a squeaky floor really isn’t the intimidating job it sounds like. Most of the time you’re looking at a ₹500 kit and half an hour, not a full renovation. The trickier part is honestly just finding the exact board — once you’ve got that pinned down, the fix itself is fairly mechanical.
If you’ve been putting this off for months (no judgment, we’ve all done it), pick one weekend, grab a squeak-repair kit from your local hardware store, and knock it out room by room. Your feet — and anyone sleeping down the hall — will thank you.